Do I have the most awesome husband ever or what? How sweet is our patio? I told Darrell I loved it so much that I wanted him to make it bigger, but he didn't really like that idea. Apparently it was a lot of work or something; I really wouldn't know because I had to work all morning and early afternoon. Bummer :)
For those of you who are interested, here's a short run-down of the steps:
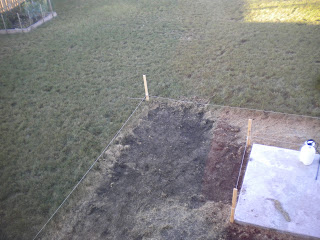
Determine the plot of land to be used and kill the grass using an herbicide. Let sit for a few days to really kill the roots (or, in our case, three weeks)
This step could probably be omitted if you were pressed for time, but it certainly makes the next step easier.
Scalp the ground to remove the sod
Since were were having to level the patio with the cement slab that the builders put at the bottom of our deck, it was really important for us to remove the grass and the grass only (because apparently it was a good idea to build the cement slab three inches above the dirt). So having all the grass dead made this step a lot easier. If depth wasn't an issue you wouldn't necessarily have to kill the grass; you could probably just get by pulling up the whole chunk of sod. An important note: Darrell was initially considering just placing the sand and patio blocks over the dead grass, but one of our super handy neighbors pointed out that as the grass decomposed it would create air pockets and potentially shift the level of the patio. So we scratched that idea and went ahead and scalped (and by we I mean Darrell--that should pretty well be understood for this whole project)
Level the ground with sand and begin laying patio blocks
I can tell you that Darrell went through A LOT of sand for this step--and even with all the sand he used (including a second trip to Menards that morning) it still wasn't enough to level the patio completely with that stupid cement slab. So there's a little bit of a toe-catch. But, a few notes on the leveling. I know that Darrell used a leftover piece of wood from our cabinets (you can see it in the upper right hand corner of the screen) to help him level, and he was excited to find this in our basement because apparently since it was a piece to be used for interior design, it was guaranteed to be super straight and level. It's also important to make sure the patio isn't 100% level because then the water will just pool on it; it should slope ever so slightly away from the house. Oh, and make sure to pack the sand down with a tamper or something to minimize shifting.
I don't have super clear explanations for laying the patio blocks since I didn't do any of this step, but what I know from talking to Darrell and listening to our neighbor is that it is (obviously) important to make sure you are laying the patio blocks straight. I know they talked about measuring off quadrants with twine and using the pythagorean theorem and whatnot to guarantee straight lines--not sure how much of that Darrell did, but I suppose it does make sense. I think Darrell was a little lax on this step mostly because it wasn't a super precise area that we were putting the patio into; if the blocks got off ever so slightly it wasn't like we were going to be running into an issue of having to cut a block down or something. And, just for fun, here's a picture of Darrell laying the last block (but don't be fooled, our steps aren't done yet!)
"Lock" the blocks in place by filling the gaps with sand
See, I did contribute a little bit! Darrell bought a special sand for this step; it's got a weed-blocker in it and it's specially formulated to be adhesive once it gets wet. We just used a broom to push the sand around the patio and let it fall into the cracks; we also walked on all the stones and tried to make the jiggle so that we could push more sand that fell into any gaps that formed. Then just spray it with water, let it dry at least overnight and you're ready for the last step.
Enjoy!
This step works best with a beer in hand and fire in the pit...
We truthfully couldn't have picked a better weekend to do this project; highs over the weekend were in the seventies, but once the sun went down the temps dropped to the forties/fifties which made it perfect weather for gathering around a fire! We're supposed to have more of the same weather this weekend (and this week!), so I fully expect the patio to get some good use!
And oh yeah--another item off the list! Only a year and a half left to get through it--eek!


No comments:
Post a Comment